
Michael Gaudreau
Staples Team Supervisor/Software Engineering Graduate of @flatiron-school
Installing pfSense on Virtualbox
Published Apr 20, 2020
This post is going to be a walkthrough of how to install pfSense on Virtualbox. I recently used a older desktop computer that was sitting around and converted it to a home server running Ubuntu and set a PHP Virtualbox so I had the ability to run some VM’s remotely from my laptop. PHP Virtualbox is just a web interface for Virtualbox that basically just gives you the same Virtualbox interface with the ability to create users and log in from another computer. I had been playing with the idea of getting some sort of firewall device to set up pfSense on to give me better control and visibility into my home network and was researching the different options when I thought about just running it as a VM and using some older hardware that I had laying around before I go and spend a couple hundred dollars on something I may not even use that much. Turns out the requirements to pfSense are pretty minimal and a older computer should do just fine. So my plan is to install a second network card into the Ubuntu server I had PHP Virtualbox, one for connecting to the modem going to the WAN (Wide Area Network) and the other going to my LAN (Local Area Network) which would go to a old TP-Link router that I installed OpenWRT on that would run as just access point for the network.
pfSense Minimum Hardware Requirements
- 500 mhz CPU (1GHz CPU Suggested)
- 1 GB of RAM
- 4GB of storage
- 2 network interface cards
Before I did all this I wanted to install it virtually and connect a few virtual instances of Linux and Windows to see how well it handled the traffic and if I was able to get the visibility and control I was looking for I went ahead and set up a virtual network to this.
So first step was going to be installing pfSense on Virtualbox
Your going to need to download the pfSense ISO

Next we need to create a new virtual machine and the type to BSD and version to FreeBSD(64-Bit), set the name to whatever you like.

Then I set the RAM to at 1024MB or 1GB, you can add more if your system can handle it. We also need a minimum of 4GB disk for storage so I went ahead and gave 5GB just to see how little space I could get away with using.


Networking
We need to have two network interfaces, one for the WAN and another for the LAN. So I kept the default network interface that is set to NAT and created another one on a internal network called virtnet1.


Last thing for the VM configuration is to open the VM’s settings and select the Storage tab and add the downloaded pfSense ISO file as the IDE Secondarry Master so it will boot up off that when you start up the machine.
Installation
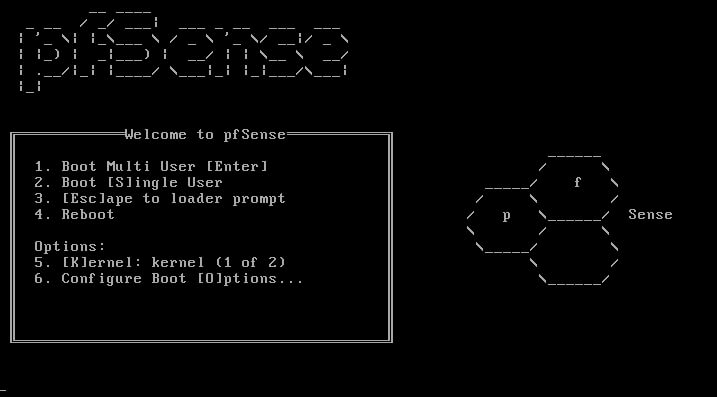
After the machine finishes it’s start up procedures you will see the main install menu, for this example we are going to select entry # 1 which is for a multi user installation so you can either type in 1 or let the time run out and it will automatically select that first option for you.
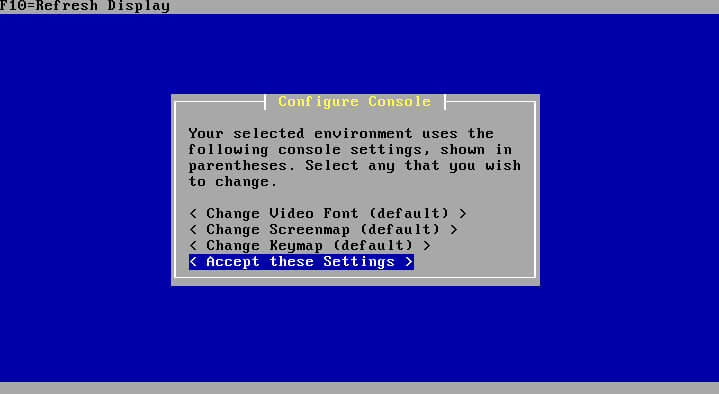
First screen is going to be setting up the correct keyboard layout, you have options to change to the Screenmap, Keymap, and Video Font but you can shouldn’t need to do so and can just keep the defaults and select Accept these Settings.
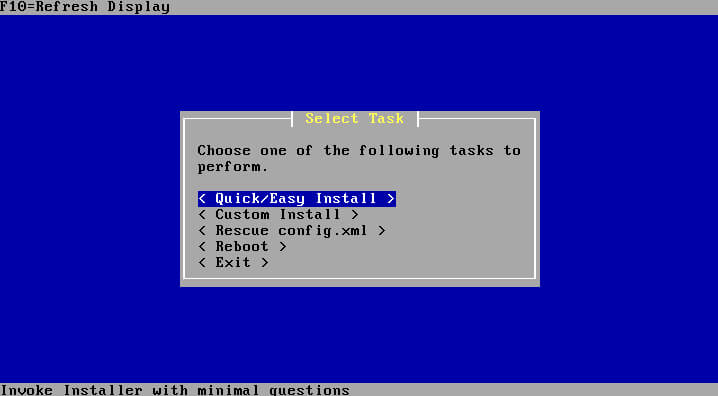
Now we are presented with different install options depending on how you want to install pfSense, for this demo we are just going to select the first option Quick/Easy Install which will ask the least amount of setup questions and be a quicker installation than the other options. It will ask you to confirm that this is what you intended after selecting it so just go ahead and accept to proceed.
When you get asked what kernel you would like to install just select the Standard kernel option to continue.
When the installation wraps up it will prompt you to reboot the system, go ahead and allow this by selecting Reboot.

Assign Interfaces
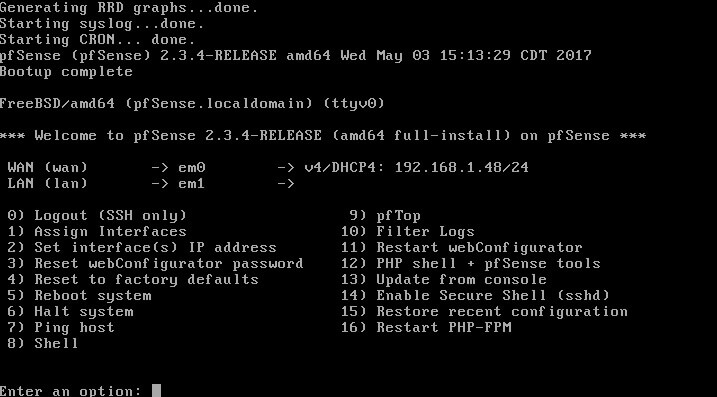
After the reboot completes you will welcomed with the main pfSense console menu, the first thing we need to do is configure the network. We do this by selecting the Assign Interfaces option # 1.
You will be prompted with a number of questions regaurding the interface setup, this is the configuration I set to get things working properly.
- Select
NoorNwhen prompted about setting up vLAN’s (we don’t need these right now) - Next type in the the first interface name as the WAN interface, it should be
em0if you have followed along so far - The following prompt will ask you which is the LAN interface which will be
em1and will be the interface all of our devices on the LAN will connect to - When it prompts for more interfaces just hit the
Enterkey with nothing typed in to finish setting up interfaces - The final prompt is just asking to confirm that the assignments are correct and should look like the following

Hit Y and Enter to confirm the assignments.
IP Configuration
Now we need to set up the proper configuration for each interface, so after returning to the main menu we want to select the Set Interfaces IP address or #2 in the menu.
By default the WAN interface will be configured to use DHCP witch will work for the setup we have so far and we only need to make changes to the LAN interface. So we need to press 2 then Enter to select the LAN interface configuration setup.

When prompted enter the IP address you want to set for the LAN IP of the pfSense machine, this can be any valid IPv4 address you want to use and for this example we will use 192.168.0.1. This will be the IP address you can reach the GUI web interface where you can manage all of the settings for pfSense and will be the default gateway for devices connected to LAN once we have finished this setup.

At the next prompt we will set subnet mask for the LAN network, we can go ahead and enter 24 which will set the subnet mask to 255.255.255.0.

The next step is asking if we want to set a upstream gateway for the network, in this case we don’t so we just hit Enter to skip this and not set a upstream gateway.

The following prompt will ask you to configure a IPv6 address, which we will skip because we only want to use IPv4 for our little test network, so just hit Enter to skip this prompt.

Now we need to enable the DHCP server for LAN interface, So we hit y to enable DHCP and then we put in the IP range we want to use for the clients on the network, you can set this to be any valid IP in the range of 2-254 but because we will not be connecting more than 5 devices to this network we are going to limit the network to only 50 addresses by entering 192.168.0.100 as the start address and 192.168.0.150 as the ending address.

Then the question is asking if we want to revert pfSense’s web interface to HTTP instead of HTTPS, there is no reason to do this for our setup so enter N and hit Enter.

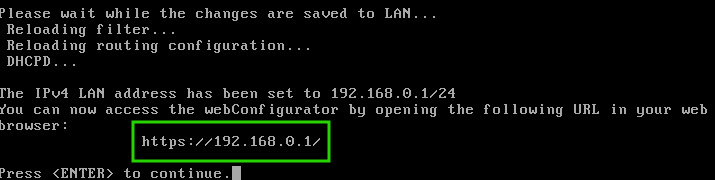
Finally pfSense will put the changes we made into effect and display the new net mask and IP address of the host machine as well as start the DHCP server. Hit Enter to return to the main menu.
Web Interface
Now we can manage the pfSense system with the web interface, go ahead 192.168.0.1 and login with the default credentials which are
username: admin
password: pfsense
The first thing you will be prompted with is a the pfSense Setup witch will take you through the settings, most of which are ones that we just configured just double check and make sure everything is correct but you shouldn’t need to change anything except for maybe the hostname and the default password.
And that’s pretty much it for getting pfSense up and running on Virtualbox, in my next post I will go over setting up some things like the firewall and Squid Proxy. If you want to boot up another VM and connect it to the network then just the VM’s network adapter to use the same the Internal Network that we set up in the beggining as the secondary Network interface of the pfSense VM.